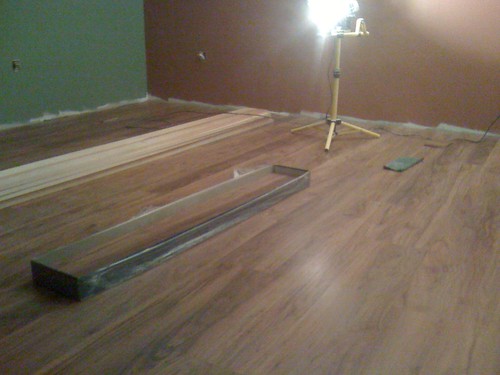
Floor is in!
It's a Pergo laminated floor that floats on the felt underlayment. I had initially bought this flooring for some upstairs bedrooms, but decided I didn't like the feel of it. Now, it's just me really, this stuff is great. We have it in our living room and it has taken all of the abuse that dogs, guests, construction.. you name it has thrown at it.
It looks great, is easy to install and really works well. So I'm going to get over my touchy feely complaints about it and learn to love it. Next is trim work and replacing the outlets with some fresh ones. Something about clean outlets and new covers, plus there's a gasket that goes behind the plate to further seal the outlet from the outside intrusion of noise... mass, air, mass air...
Oh, what's cool is when the door closes now, it has that "shhoooooommmph" sound. Like a studio door. :P
Friday, April 20, 2012
Thursday, April 19, 2012
Reality Check
Who pays a reality check? Just curious.
Paul Strikwerda just wrote a great piece on his blog about building or having a home studio. It's a great reality check for people thinking about doing VO work and toying with the idea of "how hard can it be" to do at home.
I tell people it's a rabbit hole. To to VO work, you need to be able to act well, connect with the copy and connect with the target audience. Blah blah blah. If you have researched this field, you know that and have heard that. (If you do something about it, like get a good coach, then bravo!)
Then you buy a microphone, and connect it to a recording device. This has come a LONG way! My first setup to record onto a computer had an external 1Gig hard drive that cost me a THOUSAND dollars. Sheesh! I want that thousand back! Hey, I'm not that old, it was only 20 years ago and I was using E-Magic Logic 1.5...
Anyhoo. Back to that microphone. If you're starting out, are you going to buy a three thousand dollar Neumann u87 and plop it onto the kitchen table and wonder where to plug it into your machine? No. At least I hope not. You start easy, a Shure SM7 or Electrovoice RE-20 and an M-box was a good start. Now you can use an Audio Technica with a USB output that sounds pretty nice. (pretty nice)
Then, you start hearing things. Things that creep into your headphones. Fish tank, refrigerator, neighbors kids in the yard, that DAMN LEAF BLOWER. Ok ok, so you wait till after 8 to knock out those scripts. But then you listen deeper. There's a ring in the sound or a hollow echo... now what?
You start hearing things about Room Treatment and you hear about this wonderful company called Auralex and wonder if some foam on the wall will help. (it will)
You may land a gig, get a few complements and think about that new condo in Boca.
Now, here's the dividing point. Do you A. go and introduce yourself to all of the cool studios in your city or town within reasonable walking and driving distance, demo in hand. Or do you B. think about improving your gear to something more professional and buffing out that room in the basement? (or C, BOTH!)
Here's the reality check and where Paul's blog post is so helpful. Know your limits. I had a musician friend that got an M-box and ProTools LE. She knew nothing about engineering. Nothing. The learning curve, to me, isn't hard, but I also know that I can not play guitar. C chord? nope, can't find it, can't remember it, don't try to teach me. Editing in ProTools? I do it in my sleep. (Final Cut as well, but that's a different subject.)
If you are not handy with tools. Don't try to build a booth or studio. Hire someone who has done it. It's not rocket surgery, but it's different than building a bathroom. If you know nothing about audio engineering or editing, get training or have someone else do it. You will save yourself HOURS of stress. Once again, it's not hard, it just isn't something you're born knowing. If programing the DVR gives you fits, you may want to really focus on being in a town with a couple studios that you can visit.
So, it's more than reading into a microphone. Especially if you're going to try it at home, you end up being talent, engineer, CEO, CFO, the marketing department, sales and billing...
This can be a fun and rewarding career. I've done great eLearning work, national commercial work and all sorts of projects before I started this studio build out. For me, this is about kicking it up to the next level and creating a space that I can produce consistently solid sounding work. Think audiobook. Hours of recording that sounds clean and a space that is easy to work and edit in.
Yet even I know to hand off the billing to my accountant. :)

Paul Strikwerda just wrote a great piece on his blog about building or having a home studio. It's a great reality check for people thinking about doing VO work and toying with the idea of "how hard can it be" to do at home.
I tell people it's a rabbit hole. To to VO work, you need to be able to act well, connect with the copy and connect with the target audience. Blah blah blah. If you have researched this field, you know that and have heard that. (If you do something about it, like get a good coach, then bravo!)
Then you buy a microphone, and connect it to a recording device. This has come a LONG way! My first setup to record onto a computer had an external 1Gig hard drive that cost me a THOUSAND dollars. Sheesh! I want that thousand back! Hey, I'm not that old, it was only 20 years ago and I was using E-Magic Logic 1.5...
Anyhoo. Back to that microphone. If you're starting out, are you going to buy a three thousand dollar Neumann u87 and plop it onto the kitchen table and wonder where to plug it into your machine? No. At least I hope not. You start easy, a Shure SM7 or Electrovoice RE-20 and an M-box was a good start. Now you can use an Audio Technica with a USB output that sounds pretty nice. (pretty nice)
Then, you start hearing things. Things that creep into your headphones. Fish tank, refrigerator, neighbors kids in the yard, that DAMN LEAF BLOWER. Ok ok, so you wait till after 8 to knock out those scripts. But then you listen deeper. There's a ring in the sound or a hollow echo... now what?
You start hearing things about Room Treatment and you hear about this wonderful company called Auralex and wonder if some foam on the wall will help. (it will)
You may land a gig, get a few complements and think about that new condo in Boca.
Now, here's the dividing point. Do you A. go and introduce yourself to all of the cool studios in your city or town within reasonable walking and driving distance, demo in hand. Or do you B. think about improving your gear to something more professional and buffing out that room in the basement? (or C, BOTH!)
Here's the reality check and where Paul's blog post is so helpful. Know your limits. I had a musician friend that got an M-box and ProTools LE. She knew nothing about engineering. Nothing. The learning curve, to me, isn't hard, but I also know that I can not play guitar. C chord? nope, can't find it, can't remember it, don't try to teach me. Editing in ProTools? I do it in my sleep. (Final Cut as well, but that's a different subject.)
If you are not handy with tools. Don't try to build a booth or studio. Hire someone who has done it. It's not rocket surgery, but it's different than building a bathroom. If you know nothing about audio engineering or editing, get training or have someone else do it. You will save yourself HOURS of stress. Once again, it's not hard, it just isn't something you're born knowing. If programing the DVR gives you fits, you may want to really focus on being in a town with a couple studios that you can visit.
So, it's more than reading into a microphone. Especially if you're going to try it at home, you end up being talent, engineer, CEO, CFO, the marketing department, sales and billing...
This can be a fun and rewarding career. I've done great eLearning work, national commercial work and all sorts of projects before I started this studio build out. For me, this is about kicking it up to the next level and creating a space that I can produce consistently solid sounding work. Think audiobook. Hours of recording that sounds clean and a space that is easy to work and edit in.
Yet even I know to hand off the billing to my accountant. :)
Wednesday, April 18, 2012
Studio Build 11
It goes up to eleven...
Last night I was able to really clean up the floor while the poly on the door dried. Smoothed things out and layed down the felt underlayment.
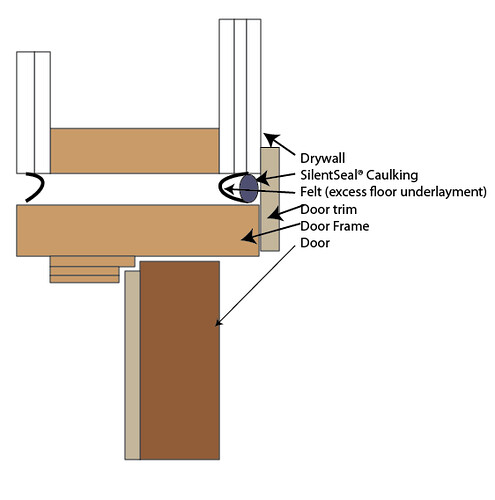
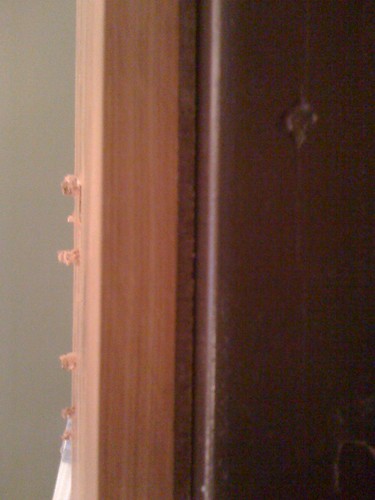
with the leftover felt, I was able to fill the gap between the door frame and the studwall. This picture isn't really clear...
but here's an overhead diagram of how it all works out. The felt will get covered by SilentSeal® caulking just prior to the trim board being placed over it.
If all goes well this evening, I'll get the floor laid down, it's a floating laminate floor and drops in pretty quickly. Then trim!
I did an initial reading with my iPhone dB meter, and it read 36dB average. So far so good.
Last night I was able to really clean up the floor while the poly on the door dried. Smoothed things out and layed down the felt underlayment.
with the leftover felt, I was able to fill the gap between the door frame and the studwall. This picture isn't really clear...
but here's an overhead diagram of how it all works out. The felt will get covered by SilentSeal® caulking just prior to the trim board being placed over it.
If all goes well this evening, I'll get the floor laid down, it's a floating laminate floor and drops in pretty quickly. Then trim!
I did an initial reading with my iPhone dB meter, and it read 36dB average. So far so good.
Monday, April 16, 2012
Studio Build 10
Ok, on Saturday I was involved in a film project where I was dressed as "The Monster" His name was Bogomil, your basic run of the mill bogeyman created by a lifetime of items that fell under the bed.
Then on Sunday we had some yard work to do, busting out the chain saw and cleaning up the mess that the power company left behind. And then! work on the door and studio!
So, here are the layers of the door, you have the base of the firedoor, a layer of GreenGlue, a 3/8" layer of masonite, and then a layer of 3/4" Australian Cypress left over from a flooring job in the downstairs apartment.
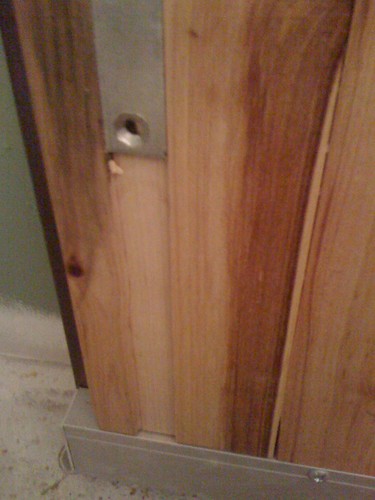
The door will have three seals, two of them are rubber gaskets, (GM Trunk Seal) and the third is a magnetic refrigerator type of seal. So in order for the magnetic seal to work, it needs something metal. So we put in a metal strip.
The metal strip sits in a routed out groove.
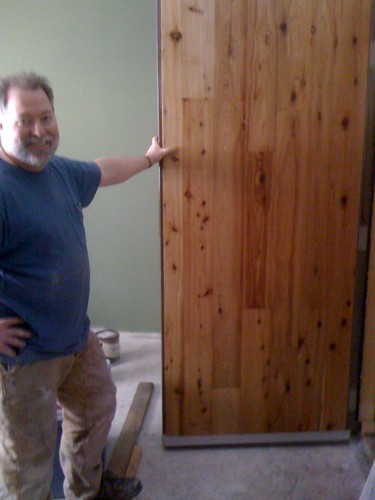
And the wood panel is now flush with the drop seal. The panel is screwed to the fire door and the screw heads are covered over with bungs. The bungs will dry for a day, and then I'll sand the door face, and give it another coat of poly.
The plan is to use a latch from a walk in cooler, that should hold things tight enough against the seals.
Stay tuned!
Then on Sunday we had some yard work to do, busting out the chain saw and cleaning up the mess that the power company left behind. And then! work on the door and studio!
So, here are the layers of the door, you have the base of the firedoor, a layer of GreenGlue, a 3/8" layer of masonite, and then a layer of 3/4" Australian Cypress left over from a flooring job in the downstairs apartment.
The door will have three seals, two of them are rubber gaskets, (GM Trunk Seal) and the third is a magnetic refrigerator type of seal. So in order for the magnetic seal to work, it needs something metal. So we put in a metal strip.
The metal strip sits in a routed out groove.
And the wood panel is now flush with the drop seal. The panel is screwed to the fire door and the screw heads are covered over with bungs. The bungs will dry for a day, and then I'll sand the door face, and give it another coat of poly.
The plan is to use a latch from a walk in cooler, that should hold things tight enough against the seals.
Stay tuned!
Monday, April 9, 2012
Studio Build 9
Life just gets crazy busy! As soon as I landed after my trip to Ventura Beach CA for FaffCon4, and a visit to some great friends at Sony Studios in Albuquerque, I was straight into rehearsals for "Broken no. 2", Hector Rivera's amazing student thesis work.
But we put on our play clothes on Sunday and GOT BUSY!
So the threshold is in.
It is raised up off the floor leaving room for the floating floor to tuck underneath it. We had to lean the door back slightly, as the room has a crown to it, and the door was going to drag on the floor, since it's a metal door and we want a tight seal, there was no reshaping the door.
We have the first layer of door gasket in, (there will be 3)
On the exterior face of the door will be another layer of material, initially I was going to use some 3/4" cabinet grade plywood I had laying around, however I evidently used that on the shed project. SO I tore into a bundle of Australian Cypress I had left over from the in-law apartment flooring. Might as well use it!
It's 3/4" and bonded now to a piece of 3/8 masonite.
Here's how it looks as I test fit it to the door. Note that it's stepped in from the edge of the door, that's due to the need to create a step for the second layer of gasket. Think bank vault door.
So, the next step is to router in a groove for a strip of steel. Why you ask? because the third layer of gasket is a magnetic seal, just like your refrigerator. The steel strip will provide something for the magnet to stick too. I also have to find a decent door handle and latch. The fire door has a standard size hole for a commercial handle set, but paying over $300 isn't in the budget. So we're going to get creative, (I'm not cheap! I'm thrifty!)
Stay tuned...
But we put on our play clothes on Sunday and GOT BUSY!
So the threshold is in.
It is raised up off the floor leaving room for the floating floor to tuck underneath it. We had to lean the door back slightly, as the room has a crown to it, and the door was going to drag on the floor, since it's a metal door and we want a tight seal, there was no reshaping the door.
We have the first layer of door gasket in, (there will be 3)
On the exterior face of the door will be another layer of material, initially I was going to use some 3/4" cabinet grade plywood I had laying around, however I evidently used that on the shed project. SO I tore into a bundle of Australian Cypress I had left over from the in-law apartment flooring. Might as well use it!
It's 3/4" and bonded now to a piece of 3/8 masonite.
Here's how it looks as I test fit it to the door. Note that it's stepped in from the edge of the door, that's due to the need to create a step for the second layer of gasket. Think bank vault door.
So, the next step is to router in a groove for a strip of steel. Why you ask? because the third layer of gasket is a magnetic seal, just like your refrigerator. The steel strip will provide something for the magnet to stick too. I also have to find a decent door handle and latch. The fire door has a standard size hole for a commercial handle set, but paying over $300 isn't in the budget. So we're going to get creative, (I'm not cheap! I'm thrifty!)
Stay tuned...
Friday, March 30, 2012
Becoming a Superhero
I was on my way south from L.A. after FaffCon4 and the thought occurred to me, I like being a hero. I like helping people, using my skills, no matter how mundane or silly to solve a problem or give someone a hand. Helping other really makes me happy.
Being a hero doesn't take much when you think about it. I don't have xray vision... although, ya have to admit, that would be cool. I can't fly without an airplane, neither could Batman. I'm strong and can lift things but a school bus is out of the question without a forklift. But if you need a hand carrying something, let me get that for you. Need a ride downtown? sure! Do you have any ideas on how to fix this? Let me look.
I can't help it, I have an overwhelming desire to see others succeed. I hold open doors, say bless you when people sneeze and offer people a pen if they need one.
I carry this mentality into my working life. Doing voice work or giving it my all on stage. It all follows the same idea, helping someone out with one of my talents. That can be a client or someone who needs a hand moving to a new apartment or fixing a bike.
Modern technology has even give us the Dick Tracy style phone. I can be reached anywhere and almost anytime by people. I need to work on a logo or a battle cry! "Spoon!!" is already taken, (damn you Tick!)
I like it. How can I help?
Ok, preaching over, back to work on the studio, but I wanted to share the idea...
Being a hero doesn't take much when you think about it. I don't have xray vision... although, ya have to admit, that would be cool. I can't fly without an airplane, neither could Batman. I'm strong and can lift things but a school bus is out of the question without a forklift. But if you need a hand carrying something, let me get that for you. Need a ride downtown? sure! Do you have any ideas on how to fix this? Let me look.
I can't help it, I have an overwhelming desire to see others succeed. I hold open doors, say bless you when people sneeze and offer people a pen if they need one.
I carry this mentality into my working life. Doing voice work or giving it my all on stage. It all follows the same idea, helping someone out with one of my talents. That can be a client or someone who needs a hand moving to a new apartment or fixing a bike.
Modern technology has even give us the Dick Tracy style phone. I can be reached anywhere and almost anytime by people. I need to work on a logo or a battle cry! "Spoon!!" is already taken, (damn you Tick!)
I like it. How can I help?
Ok, preaching over, back to work on the studio, but I wanted to share the idea...
Tuesday, March 20, 2012
Studio Build 8
Calculating the door dimensions.
There's a bit of detail missing from books about how to physically build the door, so I figured I would give some insight as to my process.
It started with the door. It's a steel door with fixed dimensions. Since I was framing out the space in which it would live, I could work from the door out. Verses trying to squeeze a door into a pre-existing space.
So, lets work with a hypothetical door and walk through the dimensions I chose. The door is 36" wide, I want a gap on both sides of 3/16", then a heavy duty frame of dimensional lumber which is 1.5" thick then a 1/4" gap on both sides.
so from the door, we have 36+(3/16+3/16)+(1.5+1.5)+(1/4+1/4) and doing some addition we come up with 36+3/4+3+1/2= 39 1/4 for a rough opening. so as long as the world is perfectly plumb and wonderful, that would work. I gave myself an additional 1/4 inch for breathing room So I framed out my rough opening to be 39 1/2" wide.
Easy right?
Now for the height there were a few things to figure. The room just had a raw plywood subfloor. I have some leftover floating floor from the living room project. So I needed to calculate how high off the floor I wanted things and still end up with a tight seal on the threshold.
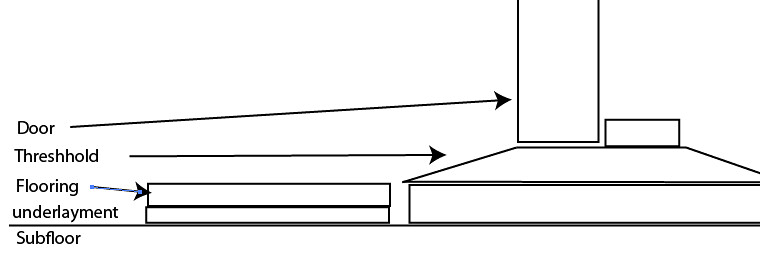
Here's what I drew up.
There's a bit of detail missing from books about how to physically build the door, so I figured I would give some insight as to my process.
It started with the door. It's a steel door with fixed dimensions. Since I was framing out the space in which it would live, I could work from the door out. Verses trying to squeeze a door into a pre-existing space.
So, lets work with a hypothetical door and walk through the dimensions I chose. The door is 36" wide, I want a gap on both sides of 3/16", then a heavy duty frame of dimensional lumber which is 1.5" thick then a 1/4" gap on both sides.
so from the door, we have 36+(3/16+3/16)+(1.5+1.5)+(1/4+1/4) and doing some addition we come up with 36+3/4+3+1/2= 39 1/4 for a rough opening. so as long as the world is perfectly plumb and wonderful, that would work. I gave myself an additional 1/4 inch for breathing room So I framed out my rough opening to be 39 1/2" wide.
Easy right?
Now for the height there were a few things to figure. The room just had a raw plywood subfloor. I have some leftover floating floor from the living room project. So I needed to calculate how high off the floor I wanted things and still end up with a tight seal on the threshold.
Here's what I drew up.
So from the subfloor working up. We have underlayment felt that is 1/8" thick, flooring that is 1/4" thick, a 1/2" threshold and a door gap of 3/16". Then the door, another 3/16" gap, a 1.5" top door frame then a 1/4" gap between the door frame and the roughed out wall framing.
The floating floor will not be physically joined to the spacer under the threshold, a small bead of silent seal will act as a cushion. It will have some movement as people walk on the floor but for me the main priority was that it wasn't going to transmit vibrations from the other side of the door. The caulk will be hidden from view as the flooring will tuck under the threshold.
The door will also have a drop seal installed, so once it closes, there will be two seals on the bottom of the door and then the seals around the edges.
Subscribe to:
Posts (Atom)